
So now you have the equipment you need to set up your wireless network. It needs to be configured but manuals being manuals, are not always that easy to follow. I’ll assume the instructions on how to plug things together are fairly straight forward. As this article is from a fairly generic point of view I will talk about the typical lights and sockets on a router and then I will carry on with how to configure your wireless. I will use Draytek equipment in my examples as they cover a lot of ground but the same applies to any router even if the terms and conventions are a little different. I know that some of you would rather do anything else than configure your router in any way. I know how you feel; I feel the same about balance sheets. For whatever reason you are configuring your wireless network, expert or amateur, I will try to make this easy to understand. If there is anything that could be made clearer or could be improved let me know and I’ll do my best. Some routers have configuration wizards that will guide you through the initial setup processes and will get you going but are not generally much help beyond that. We will start off with configuring the wireless Access Point, in our example the Access Point built into a router.
Router – The lights
This routers status panel has more lights on it than most other makes of routers and the layout is compact so it should cover the majority of lights you are likely to come across. Some routers will have other lights or will name them differently. They could be laid out in a different way.

Light | Status | Explanation |
ACT (Activity) | Off | The router is off. |
Blinking | The router is on and working normally. | |
USB (not all routers have this) | On | A working USB device is plugged in. |
Blinking | Data is moving between the USB device and the router. | |
WAN2 (2nd Wide Area Network , most routers do not have this) | On | A working WAN connection is plugged in. |
Off | A working WAN connection is not plugged in. | |
Blinking | The connection is active and data is moving about. | |
WCF (Web Content Filtering, a Draytek specific feature, not shown in this example) | On | This subscription service is enabled. |
WLAN (Wireless LAN, if you have it) | On | Wireless is active. |
Blinking | This will blink slowly while wireless traffic goes through. The ACT and WLAN LEDs blink quickly and simultaneously when WPS (see “Buttons” below) is working, it will return to normal condition after two minutes. (You need to setup WPS within two minutes.) | |
ADSL | On | Your ADSL is synchronised with your ISP (Internet Service Provider). This should stay solid once it’s connected successfully. |
Blinking | Whilst the router is trying to connect with your ISP this should blink slowly. It may pause and then blink again as it tries different methods to connect. It could take a few minutes to connect. | |
VDSL (the newer FTTC or Fibre To The Cabinet service, BT call theirs Infinity) | On | Your ADSL is synchronised with your ISP (Internet Service Provider). This should stay solid once it’s connected successfully. |
Blinking | Whilst the router is trying to connect with your ISP this should blink slowly. It may pause and then blink again as it tries different methods to connect. It could take a few minutes to connect. | |
DoS*1 (not all routers have this) | On | The DoS/DDoS functionality is enabled. |
Blinking | An attack is in progress. | |
VPN*2 (Virtual Private Network) | On | At least one VPN tunnel is active |
QoS (Quality Of Service) | On | QoS is active and giving priority to data traffic that has to have priority, for example voice traffic cannot be delayed for it to be effective. |
*1 – DoS stands for Denial Of Service and DDoS stands for Distributed Denial Of Service. This is a malicious attack by someone trying to flood your router with duplicated data. This is sometimes aimed at bringing down web sites or a service. If you continuously flood an inbound internet connection with data then it is difficult for anyone else to get a look in. The router cannot stop the attack but can stop malicious data from getting any further and let you know that it’s happening.
*2 – A Virtual Private Network (VPN) provides a tunnel between your home computer and your work computer for example. It is a more direct, faster and secure route between the 2 devices. Not all routers can support this and only some routers fully support it. This model fully supports multiple VPN’s.
Router – The sockets
Sockets may be named differently, there may be more or less and they may be in different places on different routers.

Socket | Light | Status | Explanation |
GigaLAN – sockets 1 to 3 (gigabit speeds) | Left green LED | On | There is an active connection. |
Off | No active connection. | ||
Blinking | Data is being transmitted. | ||
Right green LED | On | It is a gigabit (1,000gbs) connection. | |
Off | It is a 10mbs or 100mbs connection. | ||
GigaLAN – socket 4 – Either a 4th LAN socket or the second WAN | Left green LED | On | There is an active connection. |
Off | No active connection. | ||
Blinking | Data is being transmitted. | ||
Right green LED | On | It is a gigabit (1,000gbs) connection. | |
Off | It is a 10mbs or 100mbs connection. | ||
VDSL/ADSL |
|
| Plug in your ADSL/VDSL connection. |
USB |
|
| For your USB lead or device. |

The socket for your power adapter and the on off switch.
Router – The buttons
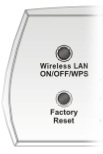
Buttons may be named differently, there may be more or less and they may be in different places on different routers.The “Wireless LAN ON/OFF/WPS” button has dual use in this example. If you press it twice it will toggle the wireless between off and on. WPS stands for “WiFi Protected Setup” and works a little like pairing a mobile phone with a Bluetooth headset. It only works WPA-PSK and WPA2-PSK security (there are several levels of wireless security and this will be discussed later on). If you press the WPS button once the ACT and WLAN LED’s will start blinking together for 2 minutes within which time you need to press the button on the connecting device or follow the procedure for that device as instructed. On this router example there is a factory reset button. If you press this and hold it down for 10 seconds (the number of seconds needed will vary between routers) your router will go back to the state it was in when you first opened the box. If the router you have is capable of backing up its configuration then take a backup every now and then so that if you do have to reset it you won’t have to start from scratch. This button is usually just inside the router so you will need something like a paper clip to put in the hole to operate it.
Router – Wireless Configuration
Ok, let’s go, let’s start easy …
Basics
Here’s an example setup screen from a Draytek Vigor 2850n. This one can handle up to four Wireless LAN’s so there are more options than you will see on most routers.

Enable
![]()
Most routers, especially if you set them up with a basic setup wizard will default the wireless to on. Tick the enable box if it’s not already ticked.
Mode
Wireless technology does not stand still, people are improving it all the time which means that there are several standards of wireless. The latest is IEEE 802.11n (IEEE stands for “Institute of Electrical and Electronics Engineers”) which unless you are techy doesn’t mean much but “Wireless N” you may have heard of. Older wireless standards are 11g, 11b and 11a. If you have older devices then they may not work with just 11n (Wireless N) so it’s best to set the mode to use all three as needed, 11b, 11g and 11n which are the most popular standards. Like this:

Index (1 to 15)
This one is another feature that you may not see on other routers but I will cover it anyway. You can set the wireless LAN to only be accessible at certain times. You can enter up to four schedules out of a choice of 16. Click the “Schedule” text link which will take you here:

Then click one of the index numbers to take you here: 
I think the date, time and duration is fairly straight forward but I will explain the technical settings.
Enable Schedule Setup
Switch it on or off, enable or disable.
Action
This allows you to specify how the wireless should behave and whether it should be on or off for a particular schedule.
- Force On – Force the wireless connection to be on.
- Force Down – Force the wireless connection to be off.
- Enable Dial-On-Demand – Specify that the connection should sleep unless required, the value of idle timeout should be set in Idle Timeout field.
- Disable Dial-On-Demand – Specify that the connection stays working when it has traffic on the line. Once there is no traffic it will sleep after the idle timeout is reached, the connection will then stay off during the relevant schedule.
Idle Timeout
Enter the number of minutes between 0 and 255 after which the connection will sleep or switch off as appropriate to the other settings.
How often
You can set the schedule as a one off or for selected days of the week from the start date onward’s.
SSID
![]()
This bit is important as this is how you know what your wireless network is called! SSID stands for “Service Set IDentifier” … not too exciting really (zzzz)! Anyway, just give it a name that will easily identify your wireless network, for example “Smith Family WiFi”, “The company – private” or maybe something more anonymous, just so long as you and the people using it can easily identify it. Here’s an example:
And here are some examples of SSID’s shown on a Windows PC.
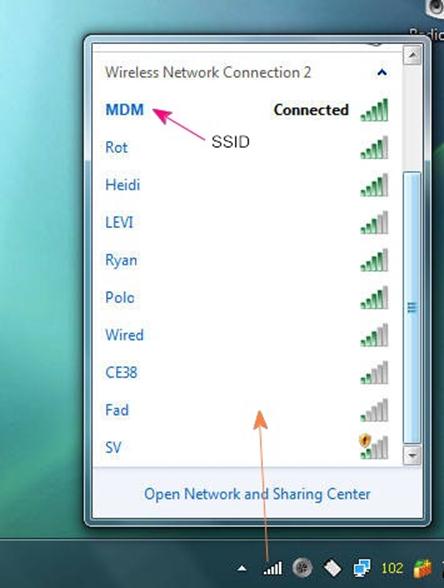
In our Draytek example you can specify up to four SSID’s which you can enable individually except for SSID1 which is set on by default when you enable wireless.
Hide SSID
If you have this option, which you should, you might want to hide your SSID so people from the street or the public in a public place for example cannot see your network therefore will not normally try to connect to it. This will mean that you will have to make a manual connection to it instead of just seeing the SSID come up on your connecting device and clicking to connect. Here’s an example of manually connecting to a wireless network if the SSID is hidden:

Isolate Member
Tick this box to stop people with connected wireless devices from accessing other connected wireless devices.
Isolate VPN
Tick this box to stop people with connected wireless devices using a VPN (Virtual Private Network) from accessing other connected wireless devices on different VPN’s. The explanation of VPN’s are outside the scope of this article but for now, if you are curious see here.
Channel
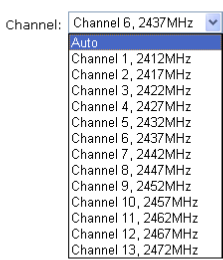
You can probably leave this on Auto. Wireless can use several frequencies and in most cases just let the system get on with it. If you suspect interference from other wireless sources, maybe outside of your control, then you might want to select specific frequencies and see if it makes any difference.
Long Pre-amble
You can ignore this unless you are still using a wireless device that uses the 11b standard. Some 11b devices sync in a different way to the norm. If you have a 11b device that will not connect to your router’s wireless then you can try ticking this box.
Packet-Overdrive
This feature is more or less Draytek specific. “TX Burst”, which stands for “Transmission Burst”, is a way of speeding up data transmission in the older standard 11g (see “Mode” above). With the new 11n standard this is no longer needed so this is likely to be phased out. You are unlikely to find this on other makes of routers or devices. You can safely ignore this feature.
Rate Control
Here you can control how much bandwidth each SSID uses, that is, how much of the available wireless network capacity should be used by each SSID. If you enable this and if you have say 2 x SSID’s active you might want to share the capacity between the two instead of the four. If one SSID is used more than another perhaps you might want to give more band width to one SSID over the other(s).
Security
Security is such a pain but unfortunately necessary. If you don’t want unknown people connecting into your wireless network and not only using your internet but perhaps getting access to your files then you will need to put some basic security on your wireless network at least. Some routers will default to an open network and some will default to a particular security regime. If you set up your router with a configuration Wizard then it may have walked you through basic wireless security.
Mode
The mode is the type of security regime you choose one of which may be “Disabled” or “None” for example which means your wireless network is open to anyone. On some routers there may be a tick box to enable wireless security in others it may be one of several modes. Here’s a list of modes which I will explain a little but don’t worry it’s not as complicated as it looks. Most modern devices will figure out which type of wireless security is being used when they try to connect and will just ask you to put in the appropriate password.
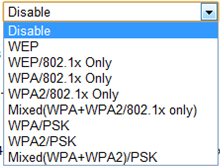
If you don’t want to read all of this bit then to make it simple the best mode is “Mixed (WPA+WPA2)/PSK”. You will need to type in a pre-shared key which will be your wireless connection password.
WEP, which stands for “Wired Equivalent Privacy”, is an older security standard. If you have wireless devices that will only work with WEP then use this. You may need to put in a 10 character hexadecimal key/password like this “0x4142B33F3C” (computers count in base 8 or 16 etc) using numbers 0-9 and letters A-F. Some routers will allow you to put in a word or phrase which will be translated into a hexadecimal key. There are two types of WEP 64 bit (10 character key) and 128 bit (13 to 26 character). Some routers will allow you to enter four WEP keys from which you select one to be active at any time. This is a slightly odd approach but does mean that you could give people four keys from which to try connecting with, one of them will work at any time if the keys are switched around. In the authors opinion this is an odd approach but it was widely used not that long ago and does work well. In this example there are four 64 bit keys which are masked. Key 1 is active.

WPA stands for “WiFi Protected Access” and PSK stands for “Pre-shared Key” which really just means security with a password. The password or PSK bit can have between 8 and 63 characters so a long password should make it pretty difficult to guess. It can also take hexadecimal for example “x4142434445464748494A4B4C4D” but I always find this harder to remember J WPA/WPA2 is more secure than WEP and WPA2 is more secure than WPA. Why one is better than the other is more than this article aims to explain but if you want to find out then please go to WiFi Protected Access and go from there. /802.1x Only– Some selections have this after the security type. This is an advanced mode where wireless passwords/keys are administered more centrally. If this regime is in use then your IT support will probably sort it out for you or you are already know what you are doing beyond the scope of this module. I will touch on it perhaps in a later module.
What happens when you connect?
If you are here then well done and you are ready to connect a device to your wireless network. This is what should happen when you go to connect … using an Android phone in this case … From the WiFi settings screen, turn the WiFi on. Once it’s on you may see a “Scanning” message whilst it looks for networks that it can access:
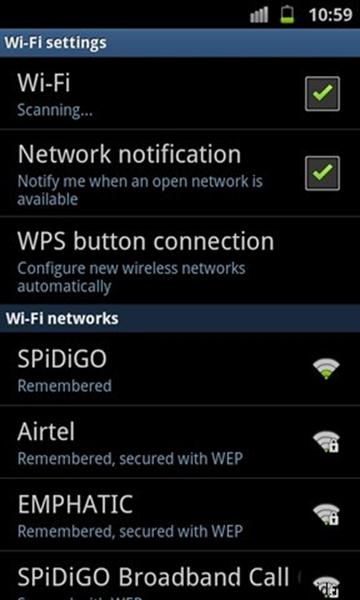
If you pick an open network, without a padlocked icon and “secured with …” message then you should be connected without further ado but if the connection is password protected then you will be asked for the password.Depending on the device you will get messages similar to this:
- Connecting …
- Authenticating … (it’s checking that you password is valid)
- Obtaining IP address … (now it needs to get you an IP address from the router so that the router knows which device is which)
- Connected (your’ done, it should say which network (the SSID) you are connected to).
Access Control
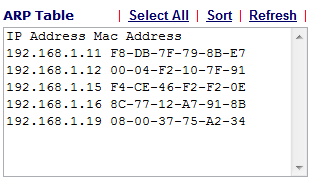
Password protecting your wireless network is the least you should do and as long as integrity is maintained everything should be fine. If unauthorised access is suspected or spotted then you can tie things down further with “Access Control”. Every device that can be networked has a MAC which stands for Media Access Control. Here’s an example “00-50-7F-DD-63-99”. There are several ways of finding out the MAC address of a device. The easiest is to look at the label for that device, it should be on there. If it’s a smart mobile phone or similar then try looking at the “Settings -> About -> Hardware Information” (Android) or “Settings -> General -> About” (iPhone), finding it on other phones or devices should be along the same lines. You can find out what is currently attached to your network by finding the appropriate list in the LAN section of your routers admin pages. In this example there are 5 devices attached with their local IP addresses and MAC addresses although you cannot see in this example which device is which. Some routers may allow you to attach names to MAC addresses if you want to define them.
Here’s an example of an Access Control screen. It can accommodate four SSID’s but most routers only have one. Note that here Access Control is only enabled for SSID 1.

Enable MAC Address Filter
See the example above but more usually enabling this security measure looks like this:
![]()
Note that in the example above you can switch between a White List (MAC’s allowed to connect) and a Black List (Mac’s not allowed to connect) for each SSID.
Policy
In the above example you can isolate devices attached to the wireless LAN so that they cannot get at your wired LAN. You would want to do this for example, if you wanted to give access to the internet and other wireless devices but not to your files which are on devices that are hard wired (guests that can access the internet and a wireless printer for example). Just tick the “Isolate the station from LAN” box for the MAC address you are entering. You might instead set a the policy to isolate the wireless LAN from the hard wired LAN entirely.

Clients MAC Address
Here you enter a new MAC address to add to the list; like “00-50-7F-DD-63-99” for example.
Attribute
Tick this box for the MAC address you are entering to stop this device from accessing the wired network.
Add, Delete, Edit, Cancel
So you can manage your Access Control lists.
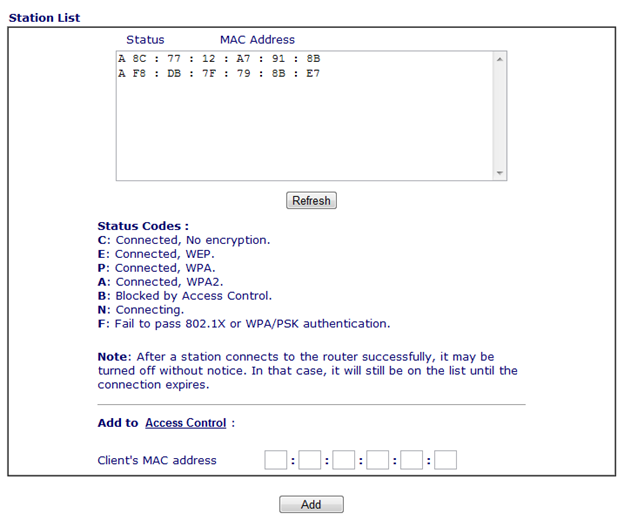
Station List
This is an odd screen in so much as it really belongs in the “Access Control” screen. Subsequently I think most routers will not have this screen. It simply shows the status of a devices connection and allows you to add a MAC address to “Access Control”.
WPS
Earlier I mentioned that you could connect a device using WPS (WiFi Protected Setup). I shall start by explaining the terms used In the diagram below:
- AP Router – This is just your wireless router, the wireless part is referred to as an Access Point, thus the “AP” bit.
- PBC – “Push Button Control” is where you press the WPS button on the router which will then wait for up to 2 minutes until you press the WPS button on the device you are trying to connect wirelessly to the router.
- PIN Code – Instead of using the push button method you can use a PIN Code. This is initially defined by the device you are trying to connect and you will have to follow the instructions for that device to define it.
Please note that WPS only works with WPA/WPA2-PSK security. 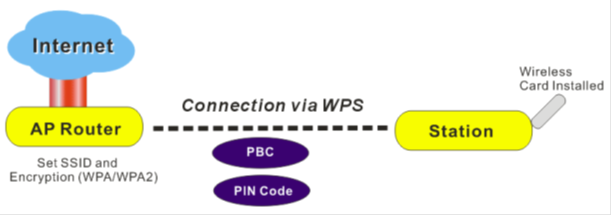
The following example is again from the Draytek Vigor 2850 series so this will look different on different routers but the essentials will be the same.

Enable WPS
Tick this to enable WPS functionality.
WPS Status
This will be “Configured” as long as the appropriate wireless security has been configured in the “Security” section above.
SSID
This is the SSID for WPS connection. It will be in fact SSID1 for the router used in this example.
Authentication Mode
This must be WPA-PSK, WPA2-PSK or both mixed as in the above example.
WPS Statuses
In the above example you can see the “WPS is Disabled” status is greyed and the “WPS is Enabled” status is on by its red circle in this case. The “Waiting for WPS requests from wireless clients” status with the circle rotating shows that the router is waiting for your device to connect.
Connect with the button
Press the button on the router or click “Start PBC” on the routers WPS settings screen (WPS LED blinks fast), then click the appropriate button or setting on the device you are trying to connect. 
Connect with a PIN code
Define or have ready the PIN code on the device you want to connect then enter it in the PIN field and click “Start PIN” on the routers WPS settings screen (WPS LED blinks fast whilst connecting is in progress). 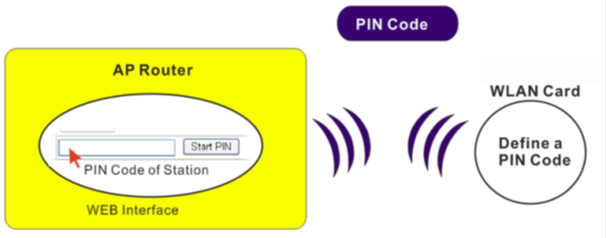
Web Portal
This feature will not be available on all routers. It simply allows a message to be displayed or redirection to a specified URL/Web Page when someone connects to your wireless network. 
Router – Advanced Wireless Configuration
I was tempted to say here “now for the tricky stuff” but it’s not tricky at all it’s just stuff that is less used than the more popular configurations above. Some of this you might not be too interested in but I would advise you to stick with it as some of this you may find useful and might discover something useful that you didn’t know.
WDS
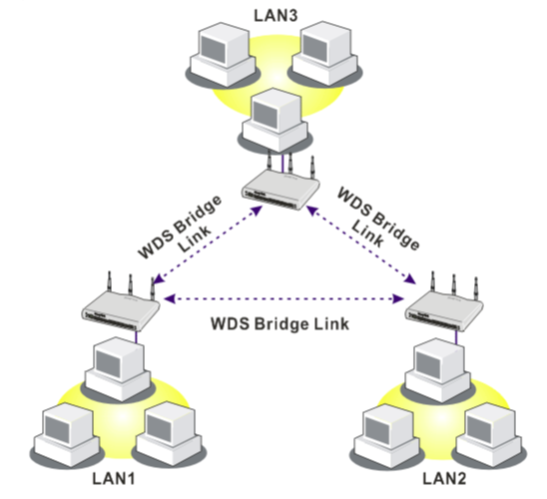
WDS stands for Wireless Distribution System. All it really means is joining two Wireless Access Points together. This can be done in two ways in this context:
Bridging
Bridging means using two Wireless Access Points as if they were a physical cable joining two LAN’s together to form one LAN. Data is forwarded back and forth as if you had hardwired two switches together. This can be done multiple times, let’s say you have 4 buildings in a campus situation where you could not easily lay cables. In this case you could bridge the distances wirelessly. A more powerful directional aerial could come in handy here as discussed in I want to setup wireless network part 1.
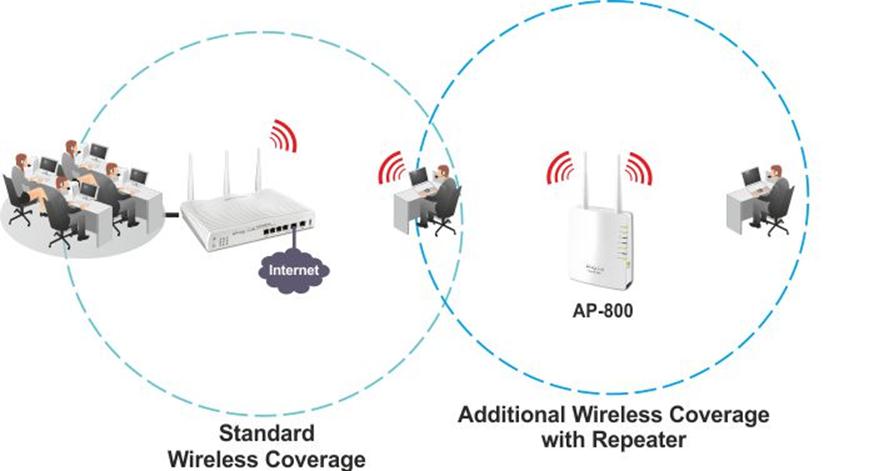
Repeating
This is used when you want to boost or repeat the wireless signal to extend your wireless networks coverage. It think this diagram shows this well.
Mode
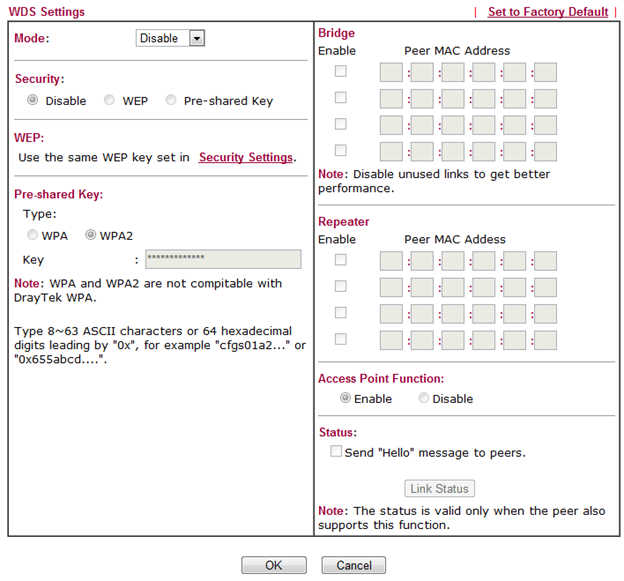
This is set to either disabled, Bridge or Repeater.
Security
Now you have a choice of having no security (Disable), using WEP or WPA/WPA2 where, as above WPA2 is best.
WEP
If you chose WEP then you may have a choice depending on the router, to use the existing WEP key or put in a new one for the bridge or repeater mode.
Pre-shared Key
As with WEP you may have a choice depending on the router, to use the existing pre-shared key or put in a new one for the bridge or repeater mode.
Bridge & Repeater MAC’s
For either of these put in the MAC addresses of the other Wireless Access Points that you want to bridge or repeat to. Remember to enable the ones you want to use and disable the ones you are not using to maintain best performance.
Access Point Function
Disable or Enable the router as an access point for bridging or repeating.
Status
If present and supported by the other Access Points you can send “Hello” messages to them.
WMM Configuration
This stands for “Wi-Fi Multi-Media”. Not all routers will have this and it may look very different on other routers management systems but it is the principle that is important to understand. This is about letting more important data through faster and letting less important data take a little bit more time if necessary. Take VoIP (Voice over Internet Protocol) phone calls, the data streams that carry a phone call need to get around fast or the conversation becomes broken and perhaps unintelligible wheras if it takes a little longer to download a web page it does not matter so much. Unless things are slow or you are having performance issues then you will probably want to ignore this area. This screen looks a bit complicated but let’s see if I can demystify it for you.
 There are two sections. The “WMM Parameters of Access Point” affect bridging and repeating (see above) and the “WMM Parameters of Station” affect the connected wireless devices.There are four types of data defined here:
- AC_BE – Email traffic
- AC_BK – Web browsing traffic
- AC_VI – Video traffic
- AC_VO – Voice traffic
The value types are defined as follows:
Aifsn
Range 1 – 15 This affects the time that a connected wireless device waits for data to be transmitted. Set low for voice and video so that the data gets processed faster.
CWMin/CWMAX
Range 1 – 15 This is to do with contention. There is lots of data contending for attention and this is a way of letting more priority data through at a time. The router will attend to certain data types more frequently. In the above example the video and voice data gets to go more often. You must set CWMax higher than CWMin.
Txop
Range 0 – 65535 This affects the priority of data transmitted. You would want to set higher values for video and voice, low for the other 2.
ACM
Tick box This stands for Admission Control Mandatory. This will restrict the appropriate type of data when ticked. You probably don’t want to tick this but let’s say you wanted to stop people viewing video’s, then you could tick it for AC_VI.
AckPolicy
Tick box This is a compromise feature. Normally when “A” sends data to “B”, “A” asks “hey B, did you get that bit of data ok” and “B” says “yes” or “no”, if “B” says no then “A” can send again. If you tick this box then “A” won’t ask “B” to acknowledge transmissions and will just blindly send data. It’s faster but might be unreliable. Normally you shouldn’t need to tick this box.
WMM Capable
This turns it on or off, enable or disable.
APSD Capable
In this example screen this is possibly an odd place for this feature. This is a power saving feature. Enabling this will mean that wireless devices can spend more time in a sleeping state. This may impact performance a little so you may want to leave this disabled.
AP Discovery
This screen allows you to find other Access Points in range so you can bridge or repeat them. Scanning takes about 5 seconds and during those 5 seconds wireless devices cannot connect. Only Access Points on the same channel can be found. This screen will vary in what it looks like and it’s functionality on other routers.
 I’ll explain the column headings:
- BSSID – The MAC address of the discovered Access Point.
- Channel – The channel the Access Point is running on.
- SSID – The SSID of the Access Point.
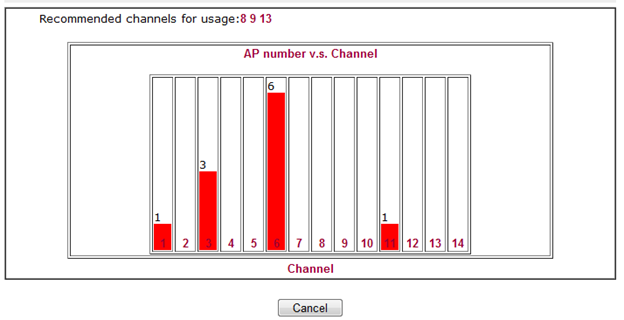
Click the “Scan” button to start the scan. You can click the “Statistics” to get the following screen which shows which channels are working the best. In this example channel 6 is looking pretty good!
 You can click the “WDS Settings” text to go straight to the WDS screen or input the MAC at the bottom, choose “Bridge” or “Repeater” and click “Add” to add it to the WDS list.
Other Advanced Settings
This is going to vary for different routers, these settings may not be present and/or may be distributed on different screens.

Operation Mode
Transmitting data wirelessly using different 802.11 standards is not as efficient as sticking to one standard. If all your devices use Wireless N / 802.11n and there is not going to be any interference from other wireless networks then set this to “Green Field” for better performance.
Channel Bandwidth
This router can use a 20mhz frequency for data transmission or if set to “20mhz / 40mhz” it will use 40mhz if other devices can support this frequency which would result in faster data transmission. A setting to try out and see if it makes a tangible difference.
Guard interval
Data is digital but wireless is not. If that makes you think “what’s he talking about” then I should not be surprised. What I mean is that data is binary, that is, a sequence of 0’s and 1’s but the wireless that transmits the digital data around is the good old fashioned wireless that you used to and still do use to listen to the radio with. The only thing that has changed really is the type of information it carries. To this end, for each little bit of data that is transmitted a little gap is put in to space the data out so one piece cannot interfere with another. This slows things down a little but there will be less errors, it’s a bit of a compromise. Some routers let you specify a short or long gap which is what this setting is all about. Probably best to leave it as it is.
Aggregation MSDU
This is to do with Wireless N and is a little trickier to explain. Without going too techy it’s a about putting lots of little “packets” into a bigger “packet” and sending them out in one go, it’s more efficient than sending them out individually to the same destination. Leave enabled in normal circumstances.
In “I want to setup a wireless network part 3″ I will talk about configuring other wireless devices etc.
Stuart
